How do I…?
Pick what you want to do — each section shows exactly where to click in HoTTY.
Connect to a device
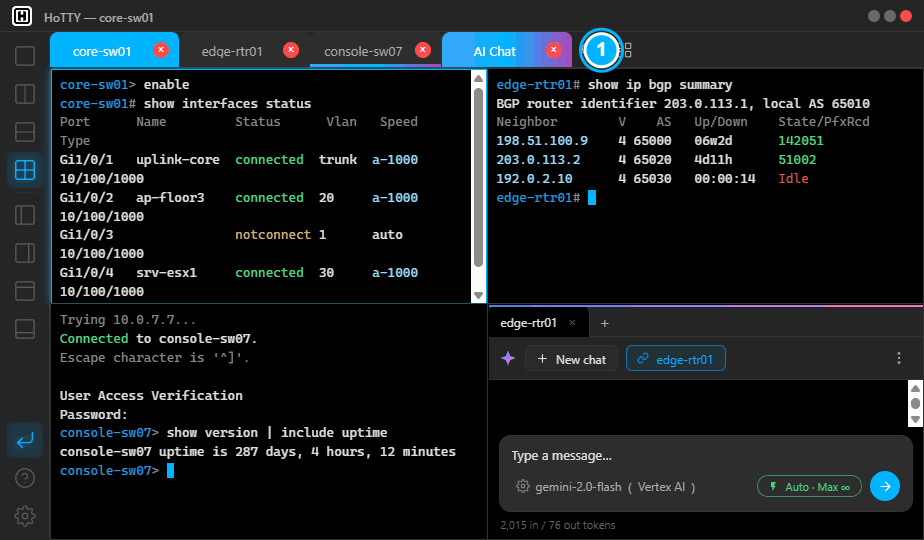
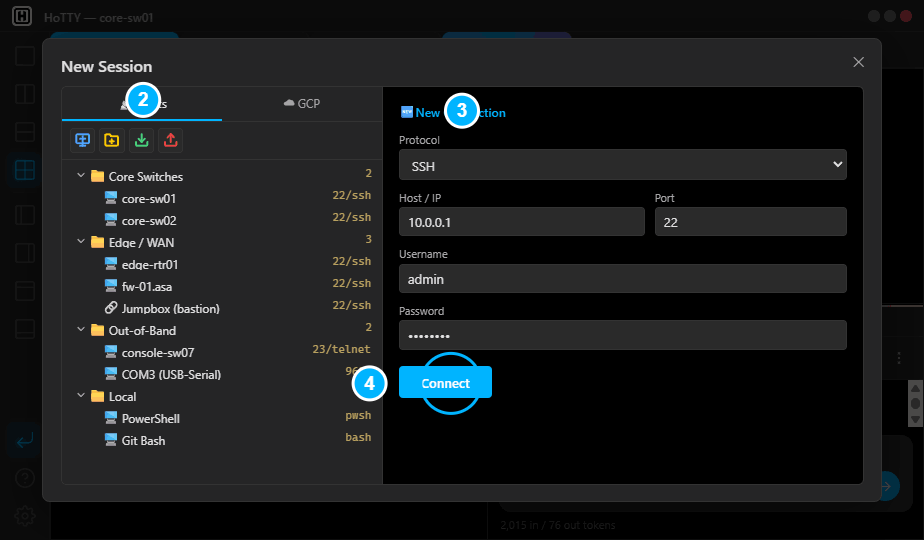
Open a session over SSH, Telnet, Serial, WSL, a local shell, or GCP IAP. After installing from GitHub Releases, launch HoTTY and:
See several sessions at once
Split the window into panes and dock tool sidebars — controlled from the App Sidebar (the icon column on the left edge).
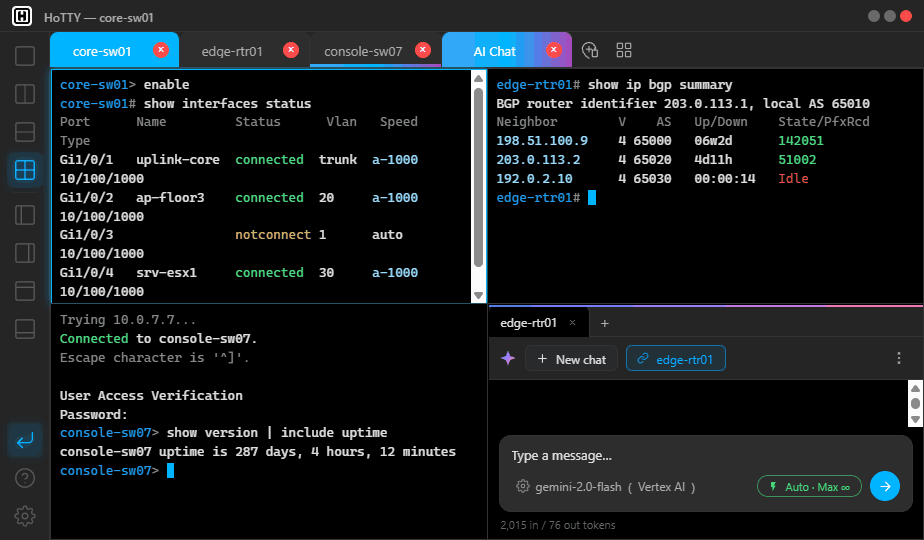
- On the App Sidebar, click a layout icon (1×1, 1×2, 2×1, 2×2, 2×3, or 3×2) to split the window into panes.
- Drag a tab onto a pane to move that session there. The pane you're working in is outlined with an accent glow.
- Switch the focused pane from the keyboard with Ctrl+Tab / Ctrl+Shift+Tab.
- Below the layout icons, use the edge icons to show or hide the left, right, top, and bottom sidebars; drag a sidebar's edge to resize it.
Ask AI about my terminal
AI is optional, uses your own API key, and never runs anything you haven't allowed.
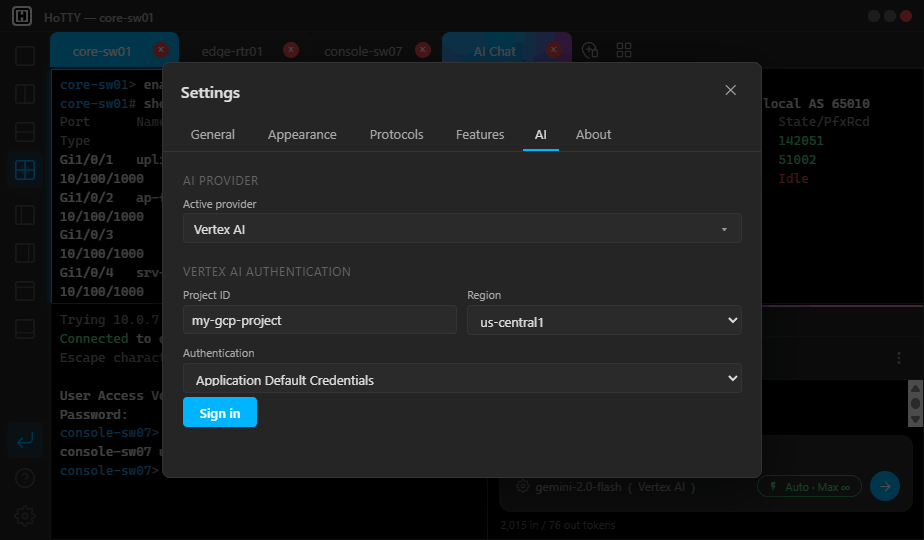
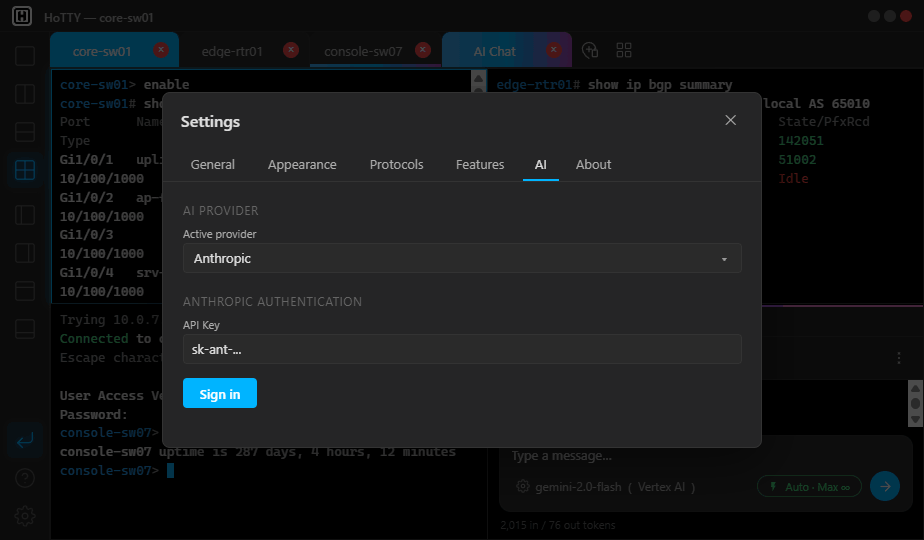
- Set it up once — open Settings (the gear at the bottom of the App Sidebar) → AI, pick a provider (Anthropic, OpenAI, Google AI Studio, or Vertex AI) and sign in with the form shown right below (an API key, a Google sign-in, or your Vertex project). See "Switch AI provider / model" below for the exact steps per provider.
- Open a chat — in the Tab Bar, click Features (the grid icon) → AI Chat. Use the link chip in the chat header to attach it to a terminal, and the model selector to choose a model.
- Ask about output — select text in a terminal, right-click → Ask AI, and type a free-form question about it.
- Let AI act — switch the chat's execution mode to Auto for Interactive Mode: it proposes and runs commands, gated by a Whitelist / Blacklist and a safety classifier, with a max-runs cap and Pause. Watch Mode follows live output and surfaces anomalies.
Switch AI provider / model
Pick the provider in Settings → AI. Each one signs in differently — the detailed steps are below.
Open Settings (the gear at the bottom of the App Sidebar) → the AI tab, and choose the Active provider. The sign-in form for that provider appears right below, along with your sign-in status and a Logout button. You sign in once; HoTTY re-authenticates automatically afterwards, and all credentials are stored locally, encrypted with Windows DPAPI. (An AI Chat pane that isn't signed in shows an Open Settings shortcut that jumps straight there.)
Vertex AI — authenticates with your Google Cloud project (ADC or a service-account key):
- Enable the Vertex AI API for your project and make sure your account (or the service account) has the Vertex AI User role (roles/aiplatform.user).
- ADC (easiest) — install the Google Cloud CLI and run
gcloud auth application-default login; HoTTY detects the credentials automatically. - Service account (alternative) — create a JSON key under IAM & Admin → Service Accounts, choose "Service Account" in the sign-in panel and point it at the key file.
- In Settings → AI, enter your Project ID, pick a Region, choose the authentication type, and click Sign in.
Anthropic / OpenAI — sign in with a plain API key:
- Anthropic: create a key at console.anthropic.com → API Keys (needs API credits — separate from a Claude.ai subscription). OpenAI: create one at platform.openai.com → API keys (billing is separate from ChatGPT Plus).
- Copy the key right away — it is shown only once.
- In Settings → AI, paste the key into the sign-in form and click Sign in.
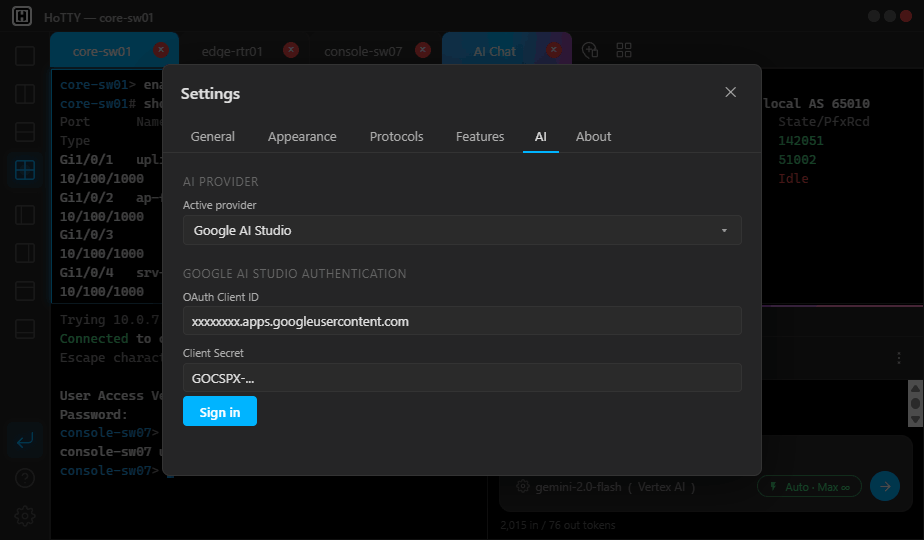
Google AI Studio (Gemini) — signs in with your Google account via OAuth2; an AI Studio API key cannot be used. Create your own free OAuth client once:
- In Google Cloud Console, create or select a project and enable the Generative Language API (APIs & Services → Library).
- Set up the OAuth consent screen ("External" is fine) and, while the app is in Testing mode, add your own Google account under Test users — without this, Google blocks the sign-in.
- Create an OAuth client ID of type Desktop app (APIs & Services → Credentials) and copy the Client ID and Client Secret — no redirect URI setup is needed.
- In Settings → AI, paste the Client ID and Client Secret and click Sign in with Google — your browser opens Google's consent page; approve within 5 minutes.
Free-tier accounts may have data used for model training — enable billing on the Google Cloud project to opt out.
Switch model — change the model anytime from the model selector in an AI Chat's input bar (e.g. gemini-2.0-flash).
Use the built-in tools
Utilities open in a pane, alongside your sessions. AI Chat, File Server, and Web Browser have their own sections below.
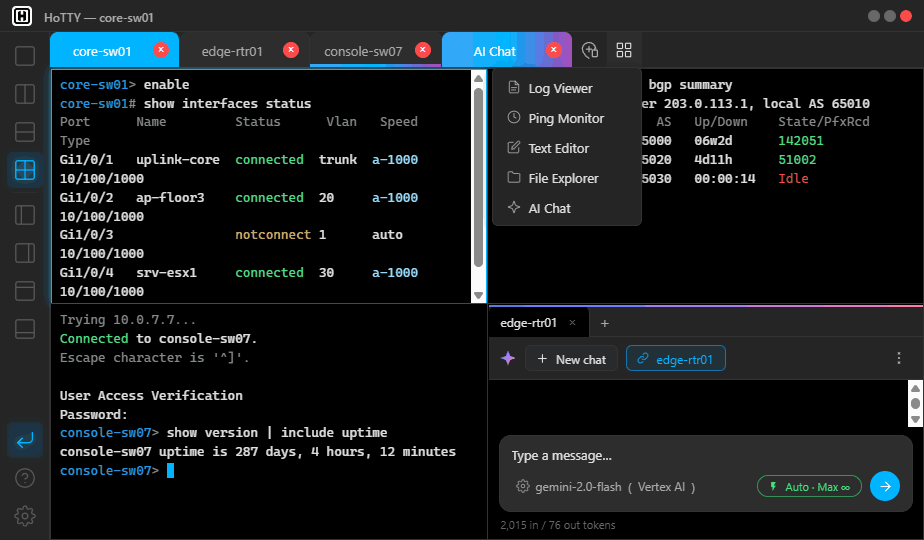
- In the Tab Bar, click Features (the grid icon) and choose a tool. It opens as a tab you can drag into any pane.
- Log Viewer — browse and read session log files.
- Ping Monitor — watch multiple targets with configurable intervals.
- Interface Traffic — live SNMP interface counters (bps, pps, errors) for switches and routers.
Open a device's web admin UI
Open router / switch / iLO / iDRAC web admin pages in an embedded browser (Edge WebView2), right beside your terminals.
- In the Tab Bar, click New Session and switch to the 🌐 Web tab.
- Choose New Web Browser for a blank tab, or double-click a saved bookmark. Type an address — only http:// and https:// are allowed, and a bare host defaults to http://.
- Use the ★ button in the toolbar to save the current page into a bookmark folder; add, rename, and drag to reorder folders in the Web tab.
- Logins persist across restarts and can be saved and autofilled — kept in HoTTY's own encrypted profile, separate from your system Edge / Chrome. Turn the whole feature off in Settings → Features.
Serve firmware to network devices
Push firmware and config images to LAN devices (Cisco copy tftp: / copy scp:) from a built-in server — no separate TFTP / SFTP host needed.
- In the Tab Bar, click Features (the grid icon) → File Server, then Browse to pick the folder to serve.
- Enable TFTP (UDP, port 69) and / or SFTP (port 2222, username / password). Serving is read-only by default — toggle Allow uploads per protocol for device→PC transfers.
- Watch the live transfer log for each client, file, and direction. Every request is jailed to the chosen folder.
- If Windows Firewall blocks inbound connections, the pane offers a one-click Allow through firewall (requires administrator). The servers stop and release their ports when you close the tab.
Record a session to a log
HoTTY can write a terminal session to a log file.
- Turn on session logging in Settings (it can also be set per session, with its own text encoding).
- Open the Log Viewer from the tab bar's Features menu to browse and read saved logs.
Change the look
Themes, fonts, and encoding live in Settings (the gear at the bottom of the App Sidebar).
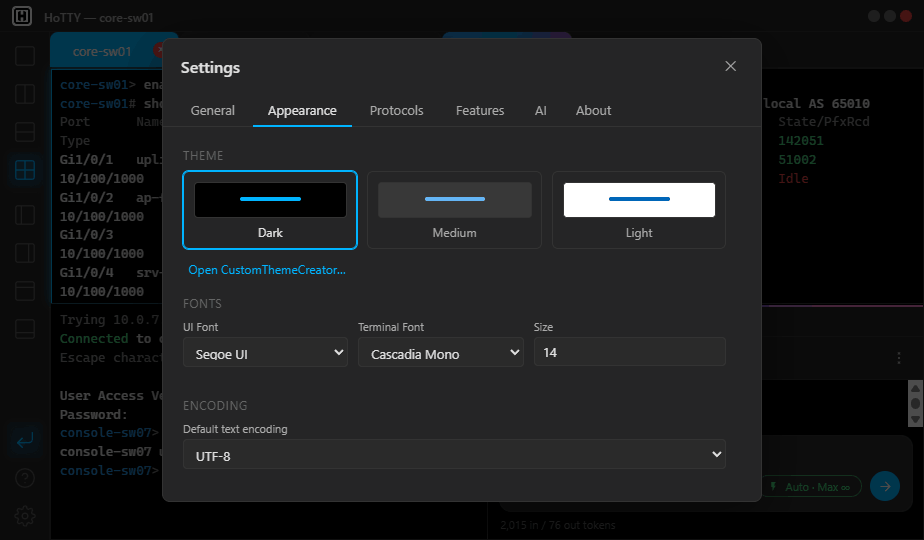
- Open Settings → Appearance, and pick a theme: Dark, Medium, or Light.
- For full control, open CustomThemeCreator and edit the ~80 named color variables to build your own theme.
- Choose the UI and terminal font and size from the fonts installed on your system.
- Set the default text encoding; you can also override it per session when you connect.
Change the display language
Use HoTTY in your language — the whole UI, not just parts.
- Open Settings (the gear at the bottom of the App Sidebar) → General.
- Pick a Display language: English, 日本語, 简体中文, 繁體中文, 한국어, Русский, Español, or Français.
- The change applies instantly with no restart, and is remembered next launch. The AI's response language is set separately in the chat.
Save & organize hosts
Keep your devices in a host tree so you can reconnect in two clicks.
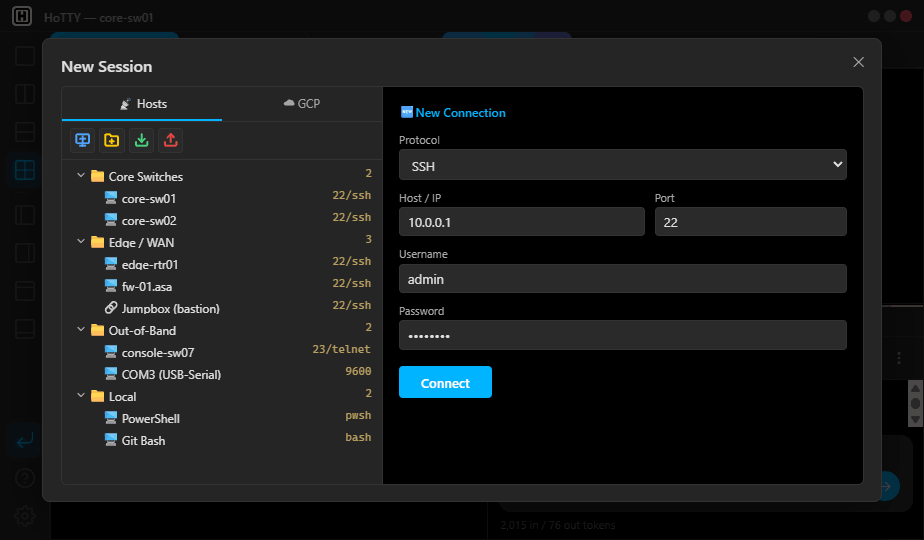
- In the New Session dialog, use the tree toolbar to Add Host or Add Folder, and group hosts into folders.
- Mark a host as a Jumpbox to chain an SSH connection through it.
- Already connected? Right-click the session tab → Save to Host Tree to store it.
- Use Import / Export in the toolbar to back up or share the tree as an encrypted .htree file.
Keyboard shortcuts
The essentials for moving around panes.
| Ctrl + Tab | Focus the next pane |
| Ctrl + Shift + Tab | Focus the previous pane |
More shortcuts and actions are available in the app's Help and right-click menus.
Update HoTTY
Keep HoTTY current.
- When a new version is available, HoTTY shows an update notification — follow it to update.
- Or download the latest installer anytime from GitHub Releases.